Data Export
Data Export List
The Data Export List shows the data export records defined in the database. The Data Export Edit page allows an operator to create, edit, and delete a data export. Data exports can be organized by the product to export (data reports, records, plots), the method of file transfer, and set up an automatic data export schedule.

Data Export List (see also the full-size image)
The Data Export List page shows all the currently defined data exports and can show details about each data export. Clicking on either column heading button will reorder the data exports in the Data Export List by name. The appearance of the Data Export List can be customized using the Details... button to access the Data Export List Details page, see the Data Export List Details section.
Click the Add button to define a new data export using the Data Export Add page. Or, click the Edit button associated with an existing data export to use that data export as a copy template for creating a new data export. The Copy button provided on the template data export's Data Export Edit page accesses the Data Export Copy page and allows creating a new data export.
Data Export List Details
The check boxes on Data Export List Details page control the items, organization, sort order, and limit the records displayed on the associated List page.

Data Export List Details (see also the full-size image)
Select the details to display
- Check the box to the left of a detail to display. Details are displayed in the order shown.
- Check the Order by box for the detail to sort first. Check Reverse for a descending sort.
- Check the Then by box for the detail to sort second. Check Reverse for a descending sort.
- Check the second Then by box for the detail to sort third. Check Reverse for a descending sort.
| Button | Action |
|---|---|
| Move Up | Move the selected detail up one row. |
| Move Down | Move the selected detail down one row. |
| Select All | Select all details. |
| Reset | Reset to default details. |
| OK | Return to previous page with new details selected. |
| Cancel | Return to previous page with no changes. |
Select the limits for the display
| Data Label | Description |
|---|---|
| User | Limit display to records assigned to the user(s). Click User: button to change Usert Pick Details and order.  Reset pick list to single select. Reset pick list to single select.  Decrease pick list length. Decrease pick list length.  Increase pick list length. Increase pick list length.  Expand pick list to multiple select. Expand pick list to multiple select.  Collapse pick list to single select. Collapse pick list to single select. |
| Scope | Limit display to records with scope: all, public, private. |
| User Group | Limit display to records assigned to the user group(s). Click User Group: button to change User Group Pick Details and order. |
Data Export Add/Copy
The Data Export Add page and the Data Export Copy page allow users to create a new data export. They function in the same way. The Data Export Copy page is most convenient when the new data export will share several parameters with the template data export. To access the Data Export Copy page, click on the Edit button in the template data export's row in the Data Export List table. The Data Export Edit page will be displayed. Click on the Copy button to reach the Data Export Copy page.
The Data Export Add/Copy page(s) prompt to enter a new data export name in the highlighted field, and provide input boxes to define other data export parameters as required.
The Data Export Edit page provides the same input fields as the Data Export Add and the Data Export Copy pages, and these are described in the Data Export Edit section.
Data Export Edit
Clicking on the Edit button associated with any data export defined in the Data Export List page displays the Data Export Edit page. The Data Export Edit page allows users to Edit the data export parameters defined for an existing data export, or to add a data export with many of the same parameters as a template data export using the Copy button.

Data Export Edit Identification (see also the full-size image)
Identification
| Data Label | Description |
|---|---|
| Table index | Field can not be modified; it is assigned automatically when a record is added. |
| Name | Enter a descriptive name for the data export. Max: 100 characters. |
| Description | Enter additional information describing data export. Max: 1000 characters. |
Owner
| Data Label | Description |
|---|---|
| User | Select the record owner from the user list. Click User: button change User Pick Details and order, see the User Pick Details section. Click Reset to assign your login name. |
| Scope | Select record access. Public: Everyone can display this record. Private: Only owner, group supervisor, or administrator can display this record. |
User groups
The User groups table shows the user groups currently assigned to the data export.
-
Clicking on any of the column heading buttons will reorder the user groups in the User groups List, numerically or alphabetically, by that detail.
-
Click Details: button to change the User Group List details and display order, see the User Group List Details section.
-
Click Assign/Remove groups button to open User Group Assignment window, see the User Group Assignment section. Changes made to user group assignments will update this page when the assignment window is closed.
-
Click the List button to show all user groups, see the User Group List section.
-
Click Add button to add a user group, see the User Group Add section.
-
Click Edit button to edit the user group, see User Group Edit section.
Data Export Product List
The Product List displays the data export products created for this data export. Data export products are maps, plots, or reports defined in the NovaStar 5 database. A product must be created before it can be added to a data export record. Multiple products can be assigned to a data export. When a data export record is first defined, no product records will be assigned to the record.
Click on the table column headers to resort the table for this column; first ascending, then descending. Click on the Details... button to change the details and display order. Click on a table field to edit the text. Click Add to add an new product; the product list edit panel is opened. Click Edit to edit an existing product; the edit panel is opened.

Data Export Product List (see also the full-size image)
| Button | Action |
|---|---|
| Clear all | Clear selection of all rows in this table. |
| Select all | Select all rows in this table. |
| Add | Opens the edit panel where parameters for a new record can be entered. |
| Edit | Open the edit panel for this record. |
| Select | Select row for applied changes from the edit panel; first select, then clear select. |
| Delete | Mark selected rows for deletion; first select, then clear select. |
| Move up | Move the selected rows up one row. |
| Move down | Move the selected rows down one row. |
| Apply | Assign changed field values to this and all other selected rows in the table. Changed fields are highlighted with a blue-green background while unchanged fields have a white background. |
| Close | Close the edit panel without saving changes; a warning will be displayed if changes will be lost by this action. |
Data Export Product List Details
The check boxes on Data Export Product List Details page control the items, organization, sort order, and limit the records displayed on the associated List page.

Data Export Product List Details (see also the full-size image)
Select the details to display
- Check the box to the left of a detail to display. Details are displayed in the order shown.
- Check the Order by box for the detail to sort first. Check Reverse for a descending sort.
- Check the Then by box for the detail to sort second. Check Reverse for a descending sort.
- Check the second Then by box for the detail to sort third. Check Reverse for a descending sort.
| Button | Action |
|---|---|
| Move Up | Move the selected detail up one row. |
| Move Down | Move the selected detail down one row. |
| Select All | Select all details. |
| Reset | Reset to default details. |
| OK | Return to previous page with new details selected. |
| Cancel | Return to previous page with no changes. |
Product list parameters

Data Export Product Edit Panel (see also the full-size image)
| Data Label | Description |
|---|---|
| Type | Map, Plot, or Report. |
| Map | Displayed when Map product type is selected. Click button to modify the map pick details. Select the map to export. |
| Plot | Displayed when Plot product type is selected. Click button to modify the plot pick details. Select the plot to export. |
| Report | Displayed when Report product type is selected. Click button to modify the report pick details. Select the report to export. |
| File name | Enter the file name for the product when it is made. The location of the file is determined by the data export action. |
| Options | Enter command options to control how the product is made by the data display pages mapDataDisplay, plotDataDisplay, reportDataDisplay (see Appendix B). The default command options used are: exportPage (value: true): No header, footer, menu on page. showDataLinks (value: false): No drill down links for data readouts. |
| Timeout | Select the product creation timeout. The data export is canceled if the product cannot be made with in the timeout interval. Click the button to alternate between interval selection from a pick list or from time interval fields. Default: 60 seconds. |
Data Export Action List
The Action List displays the data export actions to deliver the products to local or remote servers. Data export actions are None, COPY, FTP, LFTP, PFTP, SFTP.
Multiple actions can be assigned to each product. When a data export record is first defined, no action records will be assigned to the record.
Click on the table column headers to resort the table for this column; first ascending, then descending. Click on the Details... button to change the details and display order. Click on a table field to edit the text. Click Add to add an new action; the action list edit panel is opened. Click Edit to edit an existing action; the edit panel is opened.

Data Export Action List (see also the full-size image)
| Button | Action |
|---|---|
| Clear all | Clear selection of all rows in this table. |
| Select all | Select all rows in this table. |
| Add | Opens the edit panel where parameters for a new record can be entered. |
| Edit | Open the edit panel for this record. |
| Select | Select row for applied changes from the edit panel; first select, then clear select. |
| Delete | Mark selected rows for deletion; first select, then clear select. |
| Move up | Move the selected rows up one row. |
| Move down | Move the selected rows down one row. |
| Apply | Assign changed field values to this and all other selected rows in the table. Changed fields are highlighted with a blue-green background while unchanged fields have a white background. |
| Close | Close the edit panel without saving changes; a warning will be shown if changes will be lost by this action. |
Data Export List Details
The check boxes on the Data Export Action List Details page control the items, organization, sort order, and limit the records displayed on the associated List page.

Data Export Action List Details (see also the full-size image)
Select the details to display
- Check the box to the left of a detail to display. Details are displayed in the order shown.
- Check the Order by box for the detail to sort first. Check Reverse for a descending sort.
- Check the Then by box for the detail to sort second. Check Reverse for a descending sort.
- Check the second Then by box for the detail to sort third. Check Reverse for a descending sort.
| Button | Action |
|---|---|
| Move Up | Move the selected detail up one row. |
| Move Down | Move the selected detail down one row. |
| Select All | Select all details. |
| Reset | Reset to default details. |
| OK | Return to previous page with new details selected. |
| Cancel | Return to previous page with no changes. |
Action List Parameters

Data Export Action Edit Panel (see also the full-size image)
| Data Label | Description |
|---|---|
| Product | Select the product for this action from the data export product list above. |
| Type | Select how the product is sent to the local or remote server: NEED TO FILL OUT: No action. Product is left in file name defined for action. NEED TO FILL OUT: The file is copied using a shared file system. The destination folder and file name are required. NEED TO FILL OUT: Copy the product file with file transfer protocol. The destination host name, login name, password, folder and file name are required. NEED TO FILL OUT: Copy the product file with sophisticated file transfer protocol. The destination host name, login name, password, folder and file name are required. NEED TO FILL OUT: Copy the product file with passive file transfer protocol. The destination host name, login name, password, folder and file name are required. NEED TO FILL OUT: Copy the product file with secured file transfer protocol. The destination host name, login name, password, folder and file name are required. |
| Host name | Enter the destination host name as a URL or IP address |
| Login name | Enter the login name for the destination host. |
| Password | Enter the password for the login name. |
| Folder | Enter the destination folder for the file transfer. If blank then the home folder is used. |
| File name | Enter the file name for the destination file. If blank then the product file name is used. |
| Timeout | Select the file transfer timeout. The data export is canceled if the product cannot be transferred with in the timeout interval. Click the button to alternate between interval selection from a pick list or from time interval fields. Default: 60 seconds. |
Data Export Schedule List
The Schedule List displays the data export schedules to deliver the products to local or remote servers. When a data export record is first defined, no schedule records will be assigned to the record. Data export schedules are stored in the cron system file:
/etc/cron.d/novastar5-dataexport
Click on the table column headers to resort the table for this column; first ascending, then descending. Click on the Details... button to change the details and display order. Click on a table field to edit the text. Click Add to add an new schedule; the schedule list edit panel is opened. Click Edit to edit an existing schedule; the edit panel is opened.

Data Export Schedule List (see also the full-size image)
| Button | Action |
|---|---|
| Clear all | Clear selection of all rows in this table. |
| Select all | Select all rows in this table. |
| Add | Opens the edit panel where parameters for a new record can be entered. |
| Edit | Open the edit panel for this record. |
| Select | Select row for applied changes from the edit panel; first select, then clear select. |
| Delete | Mark selected rows for deletion; first select, then clear select. |
| Move up | Move the selected rows up one row. |
| Move down | Move the selected rows down one row. |
| Apply | Assign changed field values to this and all other selected rows in the table. Changed fields are highlighted with a blue-green background while unchanged fields have a white background. |
| Close | Close the edit panel without saving changes; a warning will be shown if changes will be lost by this action. |
Data Export Schedule List Details
The check boxes on Data Export Schedule List Details page control the items, organization, sort order, and limit the records displayed on the associated List page.
Select the details to display
- Check the box to the left of a detail to display. Details are displayed in the order shown.
- Check the Order by box for the detail to sort first. Check Reverse for a descending sort.
- Check the Then by box for the detail to sort second. Check Reverse for a descending sort.
- Check the second Then by box for the detail to sort third. Check Reverse for a descending sort.
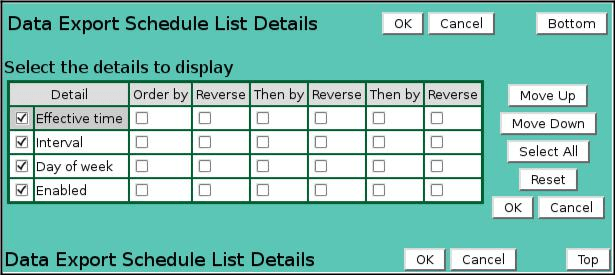
Data Export Schedule List Details (see also the full-size image)
| Button | Action |
|---|---|
| Move Up | Move the selected detail up one row. |
| Move Down | Move the selected detail down one row. |
| Select All | Select all details. |
| Reset | Reset to default details. |
| OK | Return to previous page with new details selected. |
| Cancel | Return to previous page with no changes. |
Schedule list parameters

Data Export Schedule Edit Panel (see also the full-size image)
| Data Label | Description |
|---|---|
| Effective time | Enter the time for the next scheduled action. If a past time is entered, the scheduler will adjust the time to the next scheduled time based on the schedule Interval. The default if no value is entered for the Effective time is the current time. Click the button to assign the current time. |
| Interval | Enter how often the scheduled action should execute. Enter the numeric value for the interval in the input box and the use the drop-down list to select the interval unit (minutes, hours, days, etc.). Click the Interval button to display a list of intervals to pick from. Click the Interval button again to display the interval value and time units. |
| Day of Week | Enter the days of the week on which the scheduled action should execute. Click the Day of Week button to display a multiple choice pick list for days of the week. To run the scheduled action only on Fridays, set the schedule Interval to 1 day and select only Friday from the Day of Week list. Multiple days can be selected from the list by depressing the Ctrl button on the keyboard while selecting from the list with the mouse. |
| Enabled | Select true to execute the data export at the scheduled time. Select false to leave the data export in the configuration list but do not execute it. |
Data Export Command
| Data Label | Description |
|---|---|
| Command | Enter the data export command to be executed manually or at the scheduled time. The default data export command is: nsdataexport -G# where # is the data export record index. Click the View button to display a script command file. Click the Upload button to upload a new command script file to the NovaStar 5 system. Click the Remove button to delete a command script file. Click Reset to assign the default data export command. |
Data Export Command Upload
Data export script files can be uploaded from the workstation to the NovaStar 5 system.
They are placed in the /local/bin folder of the browser which is linked to the /usr/ns/cus folder for command execution by the scheduler.
The command ownership and execute permissions are set by the upload process.
Click the Upload button to start the process.

Data Export Command Upload Start (see also the full-size image)
Click the Browse button to open the file browser on the workstation.

Data Export Command Upload File Selection (see also the full-size image)
Select the command script file from the workstation folder and click the Open button.

Data Export Command Upload Ready (see also the full-size image)
The workstation file name and path will be displayed in the upload window. Click the Upload button to upload this file to the NovaStar 5 system. When the upload is finished the Upload file success window is displayed.

Data Export Command Upload Success (see also the full-size image)
Click Close or wait a few seconds for the window to close and the uploaded command will show on the screen. Click the Apply button to save the command name in the data export record.
Data Export Manual Execution

Data Export Manual Execution (see also the full-size image)
| Data Label | Description |
|---|---|
| Timeout | Select the data export command timeout. The data export is canceled if the products cannot be made and transferred with in the timeout interval. Click the button to alternate between interval selection from a pick list or from time interval fields. Default: 60 seconds. |
Click the Run command button to execute the data export command; activity is shown in the display window.
| Button | Action |
|---|---|
 |
Run command; display activity in command display window. |
 |
Stop command. |
 |
Clear display window. |
|
Decrease display window height. |
|
Increase display window height. |
 |
Decrease display window width. |
 |
Increase display window width. |
Data Export Delete
To delete a data export from the Data Export List, click Edit on that record's event's row in the Data Export List table and then click Delete from the Data Export Edit screen. The Data Export Delete page will display a prompt to click the Delete button again to confirm that the record should be deleted. Clicking the Delete button a second time will delete the record from the Data Export List. Automatic execution of a data export can be suspended without deleting the record by setting the schedule Enabled state to false.