Alarms - Alarm Groups, Alarm Triggers, and Alarm Actions
- Overview
- Active Alarm List
- Historic Alarm Request
- Alarm Group List
- Alarm Point List
- Alarm Trigger List
- Alarm Trigger Type List
- Alarm Action List
- Alarm Contact List
- Alarm State List
Overview
One of NoveStar5's main features is its ability to detect and announce alarm conditions. New data values stored in the database are checked against alarm criteria assigned to each data point included in an alarm group. Non-status points are typically checked for upper and lower limits, and rise and fall rates of change. Each line of a status sensor data report is tested for a status state or a change in state. NovaStar 5 can also monitor a data reporting time limit, so that if new data is not stored in the database within the limit, the point meets an alarm condition.
Users are able to configure alarms in NovaStar 5 using alarm groups to allow inputs from similar sensors to be evaluated for alarm conditions. For example, an alarm group could be defined that included maximum rate-of-change criteria for stage sensors throughout a monitored area. In NovaStar 5, the criteria that qualify data for alarm activation are called alarm triggers. An alarm group can include more than one alarm trigger, and when an alarm condition is triggered, NovaStar 5 can be configured to take any number of associated alarm actions intended to alert appropriate personnel to the alarm condition. Notification of an alarm condition can occur by telephone, pager, email, voice dialer, etc.
Alarms in NovaStar 5 have associated alarm states, not all of which are mutually exclusive. At the most basic level, NovaStar 5 alarms are either active, or off. When a data report meets an alarm group's criteria, the alarm is made active. The alarm remains active until it is BOTH acknowledged and reset, at which time the alarm state returns to off. The reset is an automatic operation, independent of acknowledgement, and occurs when data report values meet the criteria that have been established for reset during alarm configuration. Therefore, a precipitation alarm remains active for as long as the precipitation values are above the alarm criteria for precipitation, and the NovaStar 5 alarm database table correctly accounts for the duration of the alarm condition associated with database values. Acknowledging the alarm suspends NovaStar 5's alarm actions related to the alarm condition. This prevents NovaStar 5's alarm actions from becoming a nuisance after you are aware of an alarm condition. The below image depicts the independent function of the acknowledgement and reset processes for alarm deactivation.

Alarm activation and deactivation logic (see also the full-size image)
When a user selects the Alarms menu option, the Active Alarm List page appears, and a subordinate menu of Alarm commands becomes available: Active Alarm List, Historic Alarm List, Alarm Group List, Alarm Trigger List, Alarm Action List, and Alarm Contact List.
Active Alarm List
Click on the Alarms menu list option to display the Active Alarm List page. There will be No active alarms listed unless NovaStar 5 has detected an alarm condition associated with an incoming data stream. The Active Alarm List page always reports the status of the system alarms, whether there are active alarm(s) or not, by indicating either that Alarms are enabled or that Alarms are disabled.
Four buttons options are available on the Active Alarm List page above the alarm list. These buttons Acknowledge alarms, Disable or Enable Alarms, Mute or Restore audible active alarms, or set alarm display Options.

Active Alarm List (see also the full-size image)
Acknowledge alarms
When Acknowledge is used to acknowledge an active alarm or alarms, NovaStar 5 suspends the alarm actions associated with that alarm. The alarm remains active until it is reset. This prevents the alarm actions generated by an active alarm from becoming a nuisance during an alarm condition.
Mute or Restore audible alarms
| Data Label | Description |
|---|---|
| Mute | Click button to silence the audible alarm on this workstation. This neither acknowledges an active alarm nor disables other alarm actions associated with other active alarms. The audible beeping of an active alarm is silenced. |
| Restore | Click button to restore the audible alarm on this workstation. |

Active Alarm List Options (see also the full-size image)
Alarm display options
| Data Label | Description |
|---|---|
| Alarm Recheck Interval | Select the alarm check interval. All pages will check for new alarms at this interval. Select none to disable alarm checking. Click the button to alternate between interval selection from a pick list or from time interval fields. |
| Alarm Display Interval | Select the active alarm display period. Click the button to alternate between interval selection from a pick list or from time interval fields. |
| Alarm Sound | Select the type of audible alarm for the workstation. This does not affect the console alarm unless the workstation is the console. Console beep: use the workstation buzzer. Sound card: use the workstation sound card and speakers. None: no audible alarm |
| Apply | Click button to save changes to active alarm display options. |
| Cancel | Click button to close display options tool without saving changes. |
Alarm disable options
It is possible to Disable Alarms to prevent new active alarms from initiating alarm actions that could become a nuisance during an emergency, for example, as widespread precipitation triggers alarms at one station after another. When alarms are disabled, NovaStar 5's data checking for alarm criteria continues and new alarms are logged in the database without starting new alarm actions. Data will still be logged in the database and available for review and response planning, but once an active alarm condition has been acknowledged, it is potentially unhelpful for NovaStar 5 to continue alarm actions related to new active alarms.

Active Alarm List Disable Alarms (see also the full-size image)
| Data Label | Description |
|---|---|
| Alarm Disable Interval | Select the alarm disable interval. Alarms will no longer show on the workstation until the disable interval has passed. Click the button to alternate between interval selection from a pick list or from time interval fields. |
| Alarm Disable Scope | Select the scope of the alarm disable (only available for administrator). private: alarms disabled on the workstation only. system: alarms are disabled on the system for everyone. |
| Disable Alarms | Click button to disable alarms. |
| Cancel | Click button to close display options tool without saving changes. |
Disabling system alarms modifies the alarms_enable record in the configuration table, see the Configuration List section. The record value is set to false (alarms disabled) and the options field is set to the alarms re-enable time. The Active Alarm List will show the alarms disabled state and the re-enable time.
Alarm enable options
Clicking on the Enable Alarms buttons will restore alarm actions. When alarms are enabled, alarm actions are taken when the alarm checking determines that the alarm criteria are met, reset, or both. In other words, NovaStar 5 will activate alarms when a data report meets the criteria for resetting an alarm as well as for setting an alarm. This notification indicates that data values are "returning to normal", given reset criteria that depend upon the alarm trigger type. See the Alarm Trigger List section for information about alarm triggers.

Active Alarm List Enable Alarms (see also the full-size image)
| Data Label | Description |
|---|---|
| Alarm Enable Scope | Select the scope of the alarm enable (only available for administrator). private: alarms enabled on the workstation only. system: alarms are enabled on the system for everyone. |
| Enable Alarms | Click button to enable alarms. |
| Cancel | Click button to close display options tool without saving changes. |
The Active Alarm List page shows all of the active alarms occurring in the NovaStar 5 system. Clicking on any of the column heading buttons will reorder the active alarms in the Active Alarm List, numerically or alphabetically, by that detail. The appearance of the Active Alarm List can be customized using the Choose details... button to access the Active Alarm List Details page.
Users may wish to Add or Edit active alarms for system testing, training or response simulations or for other reasons; but unless there is at least one active alarm, there is no access to the Add or Edit buttons. To create an active alarm and access these capabilities, edit a historic alarm and reset its alarm state to active. Or, set up an alarm group with triggers that will create an active alarm. Then, the Add button at the upper right-hand corner of the Active Alarm List table can be used to create a new active alarm using the Active Alarm Add page. Or, click the Edit button associated with an existing active alarm to use that active alarm as a copy template for creating a new active alarm. The Copy button provided on the template active alarm's Active Alarm Edit page accesses the Active Alarm Copy page and allows creation of a new active alarm as described below.
Active Alarm List Details
The check boxes on Active Alarm List Details page control the items, organization, sort order, and limit the records displayed on the List page.

Active Alarm List Details (see also the full-size image)
Select the details to display
- Check the box to the left of a detail to display. Details are displayed in the order shown.
- Check the Order by box for the detail to sort first. Check Reverse for a descending sort.
- Check the Then by box for the detail to sort second. Check Reverse for a descending sort.
- Check the second Then by box for the detail to sort third. Check Reverse for a descending sort.
| Button | Action |
|---|---|
| Move Up | Move the selected detail up one row. |
| Move Down | Move the selected detail down one row. |
| Select All | Select all details. |
| Reset | Reset to default details. |
| OK | Return to previous page with new details selected. |
| Cancel | Return to previous page with no changes. |
Select the limits for the display
| Data Label | Description |
|---|---|
| Alarm Point | Limit display to alarms assigned to the selected station type(s). Click Alarm Point: button to change Alarm Point Pick Details and order.  Reset pick list to single select. Reset pick list to single select.  Decrease pick list length. Decrease pick list length.  Increase pick list length. Increase pick list length.  Collapse pick list to single select. Collapse pick list to single select. |
| Alarm Trigger | Limit display to alarms assigned to the alarm trigger(s). Click Alarm Trigger: button to change Alarm Trigger Pick Details and order. |
| Alarm States | Limit display to alarms with selected alarm state. |
| User Group | Limit display to alarms assigned to the user group(s). Click User Group: button to change User Group Pick Details and order. |
Active Alarm Add/Copy
The Active Alarm Add page and the Active Alarm Copy page allow users to create new active alarms. They function in the same way. The Active Alarm Copy page is most convenient when the new active alarm will share several parameters with the template active alarm. To access the Active Alarm Copy page, click on the Edit button in the template active alarm's row in the Active Alarm List table. The Active Alarm Edit page will be displayed. Click on the Copy button to reach the Active Alarm Copy page.
The Active Alarm Add/Copy page(s) allows entering the new active alarm parameters. The Active Alarm Edit page provides the same input fields as the Active Alarm Add and the Active Alarm Copy pages, and these are described in Active Alarm Edit section.
Active Alarm Edit
Clicking on the Edit button associated with any active alarm defined in the Active Alarm List page, or when clicking Apply from the Active Alarm Add or Active Alarm Copy pages to create a new alarm, displays the Active Alarm Edit page. The Active Alarm Edit page allows users to Edit active alarm parameters or to add an active alarm with many of the same parameters as the template active alarm using the Copy button. The alarm parameters are grouped under Identification, Trigger, Acknowledgement, and Reset.

Active Alarm Identification (see also the full-size image)
Identification
| Data Label | Description |
|---|---|
| Table index | Field cannot be modified; it is assigned automatically when a record is added. |
| Type | Select the alarm type: Point: Alarm triggered by alarm group criteria. System: Alarm triggered by system criteria such as Data Collection Stopped. |
| State | Select the alarm state from the pick list: Off: Alarm is no longer active because of acknowledgement and reset. Active: Alarm is active. Ack: Alarm has been acknowledged but not reset. Hidden: Alarm is not displayed in active alarm list. Reset: Alarm has been reset but not acknowledged. Click State: button to change the Alarm State Pick Details, see the Alarm State Pick Details section. View button displays the Alarm State Edit. List button displays the Alarm State List page, see the Alarm State List section. |
| Point | Select the point assigned to the active alarm from the pick list. Click button to change the Point Pick Details, see the Point Pick Details section. View button displays the Point Edit page for the selected point, see the Point Edit section. List button displays the Point List page, see the Point List section. |
| Time | Date and time the alarm was triggered. Use the date and time format displayed to the right of the time field. Click the button to assign the current time. |
| Trigger | Select the alarm trigger assigned to the active alarm from the pick list. Click button to change the Alarm Trigger Pick Details, see the Alarm Trigger Pick Details. View button displays the Alarm Trigger Edit page for the selected point, see the Alarm Trigger Edit section. List button displays the Alarm Trigger List page, see the Alarm Trigger List section. |
| Time | Date and time of data report that triggered alarm. Use the date and time format displayed to the right of the time field. Click the button to assign the current time. |
| Value | Point data scaled value or change in scaled value that triggered the alarm. Interval: Time interval used to compute the change in scaled value that triggered the alarm. Click the button to alternate between interval selection from a pick list or from time interval fields. |
| Message | Message copied from trigger. Max: 1000 characters. |
Acknowledgement
The acknowledgement fields are set by the NovaStar 5 system when an alarm is acknowledged.
| Data Label | Description |
|---|---|
| Time | Time alarm was acknowledged. Use the date and time format displayed to the right of the time field. Click button to assign the current time. |
| User | Name of the user who acknowledged the alarm. Click button to assign your login user name. |
| Message | Message entered by acknowledging user to describe any actions taken. |
| Reset | The reset fields are set by the NovaStar 5 system when an alarm is reset. |
| Time | Time alarm was reset. Use the date and time format displayed to the right of the time field. Click button to assign the current time. |
| Value | Point data scaled value or change in scaled value that reset the alarm. |
| Interval | Time interval used to compute the change in scaled value that reset the alarm. Click the button to alternate between interval selection from a pick list or from time interval fields. |
| User | Name of user who reset the alarm. Click button to assign your login user name. |
Active Alarm Delete
To delete an active alarm from the Active Alarm List, click Edit on that active alarm's row in the table and then click Delete from the Active Alarm Edit screen to view the Active Alarm Delete page. The Active Alarm Delete page prompts to click the Delete button again to confirm that the active alarm should be deleted.
Historic Alarm Request
Click on the Historic Alarm List menu to display the Historic Alarm Request page.

Historic Alarm Request (see also the full-size image)
| Data Label | Description |
|---|---|
| Starting Time | Select the starting time for the historic alarm display. Click Reset Time to start of day for ending time. Note: the starting time must be before the ending time. |
| Ending Time | Select the ending time for the historic alarm display. Select Current to set the ending time to the current time. |
Click the OK button to display the historic alarms for the selected time period.
Historic Alarm List
The Historic Alarm List shows all the alarms that have been logged into the NovaStar 5 historic alarm database table for the time period selected by the Historic Alarm Request page. Clicking on any of the column heading buttons will reorder the historic alarms in the Historic Alarm List, numerically or alphabetically, by that detail. The appearance of the Historic Alarm List page can be customized using the Choose details... button to access the Historic Alarm List Details page, see the Historic Alarm List Details section.

Historic Alarm List (see also the full-size image)
A user might wish to create historic alarms to test the system or create examples for training or other purposes. Use the Add button at the upper right-hand corner of the Historic Alarm List table to create a new historic alarm using the Historic Alarm Add page. Or, click the Edit button associated with an existing historic alarm to use that historic alarm as a copy template for creating a new historic alarm. The Copy button provided on the template historic alarm's Historic Alarm Edit page accesses the Historic Alarm Copy page and allows creation of a new historic alarm as described below.
Historic Alarm List Details
The check boxes on Historic Alarm List Details page control the items, organization, sort order, and limit the records displayed on the List page.

Historic Alarm List Details (see also the full-size image)
Select the details to display
- Check the box to the left of a detail to display. Details are displayed in the order shown.
- Check the Order by box for the detail to sort first. Check Reverse for a descending sort.
- Check the Then by box for the detail to sort second. Check Reverse for a descending sort.
- Check the second Then by box for the detail to sort third. Check Reverse for a descending sort.
| Button | Action |
|---|---|
| Move Up | Move the selected detail up one row. |
| Move Down | Move the selected detail down one row. |
| Select All | Select all details. |
| Reset | Reset to default details. |
| OK | Return to previous page with new details selected. |
| Cancel | Return to previous page with no changes. |
Select the limits for the display
| Data Label | Description |
|---|---|
| Alarm Point | Limit display to alarms assigned to the selected station type(s). Click Alarm Point: button to change Alarm Point Pick Details and order. Reset pick list to single select. Decrease pick list length. Increase pick list length.  Expand pick list to multiple select. Collapse pick list to single select. Expand pick list to multiple select. Collapse pick list to single select. |
| Alarm Trigger | Limit display to alarms assigned to the alarm trigger(s). Click Alarm Trigger: button to change Alarm Trigger Pick Details and order. |
| Alarm States | Limit display to alarms with selected alarm state. |
| User Group | Limit display to alarms assigned to the user group(s). Click User Group: button to change User Group Pick Details and order. |
Historic Alarm Add/Copy
The Historic Alarm Add page and the Historic Alarm Copy page allow users to create new historic alarms. They function in the same way. The Historic Alarm Copy page is most convenient when the new historic alarm will share several parameters with the template historic alarm. To access the Historic Alarm Copy page, click on the Edit button in the template historic alarm's row in the Historic Alarm List table. The Historic Alarm Edit page will be displayed. Click on the Copy button to reach the Historic Alarm Copy page.
The Historic Alarm Add/Copy page(s) allow entering the new historic alarm parameters. The Historic Alarm Edit page provides the same input fields as the Historic Alarm Add and the Historic Alarm Copy pages, and these are described in the Historic Alarm Edit.
Historic Alarm Edit
Clicking on the Edit button associated with any historic alarm defined in the Historic Alarm List page, or clicking Apply from the Historic Alarm Add or Historic Alarm Copy pages to create a new alarm displays the Historic Alarm Edit page. The Historic Alarm Edit page allows users to Edit historic alarm parameters or to add an historic alarm with many of the same parameters as the template historic alarm using the Copy button. Historic alarm parameters are the same as active alarm parameters, see the Active Alarm Edit section for a description of these parameters.

Historic Alarm Edit (see also the full-size image)
Historic Alarm Delete
To delete an historic alarm from the Historic Alarm List, click Edit on that historic alarm's row in the table and then click Delete from the Historic Alarm Edit screen to view the Historic Alarm Delete page. The Historic Alarm Delete page prompts to click the Delete button again to confirm that the historic alarm should be deleted.
Alarm Group List
Clicking on the Alarm Group List menu command displays the Alarm Group List page. Alarm groups are used to organize database points that can be assigned similar alarm criteria. For a new NovaStar 5 system, no alarm groups will appear on the Alarm Group List page. Click the Add button at the upper right-hand corner of the Alarm Group List table to define an alarm group using the Alarm Group Add page. See the Alarm Group Edit section. A new alarm group can also be created based on an existing template alarm group using the Alarm Group Copy page. See the Alarm Group Edit section.

Alarm Group List (see also the full-size image)
The Alarm Group List shows all of the alarm groups currently defined in the NovaStar 5 system and can show details about each alarm. Clicking on any of the column heading buttons will reorder the alarm groups in the Alarm Group List, numerically or alphabetically, by that detail. The appearance of the Alarm Group List can be customized using the Choose details... button to access the Alarm Group List Details page, see the Alarm Group List Details section.
Alarm Group List Details
The check boxes on Alarm Group List Details page control the items, organization, sort order, and limit the records displayed on the associated List page.

Alarm Group List Details (see also the full-size image)
Select the details to display
- Check the box to the left of a detail to display. Details are displayed in the order shown.
- Check the Order by box for the detail to sort first. Check Reverse for a descending sort.
- Check the Then by box for the detail to sort second. Check Reverse for a descending sort.
- Check the second Then by box for the detail to sort third. Check Reverse for a descending sort.
| Button | Action |
|---|---|
| Move Up | Move the selected detail up one row. |
| Move Down | Move the selected detail down one row. |
| Select All | Select all details. |
| Reset | Reset to default details. |
| OK | Return to previous page with new details selected. |
| Cancel | Return to previous page with no changes. |
Select the limits for the display
| Data Label | Description |
|---|---|
| Point | Limit display to alarm groups assigned to the point(s). Click Point: button to change Point Pick Details and order. Reset pick list to single select. Decrease pick list length. Increase pick list length. Expand pick list to multiple select. Collapse pick list to single select. |
| Alarm Trigger | Limit display to alarm groups assigned to the alarm trigger(s). Click Alarm Trigger: button to change Alarm Trigger Pick Details and order. |
| Alarm States | Limit display to alarms with selected alarm state. |
| User Group | Limit display to alarm groups assigned to the user group(s). Click User Group: button to change User Group Pick Details and order. |
Alarm Group Pick Details
The check boxes on Alarm Group Pick Details page control the items, organization, sort order, and limit the records displayed on the pick list.

Alarm Group Pick Details (see also the full-size image)
Select the details to display
- Check the box to the left of a detail to display. Details are displayed in the order shown.
- Check the Order by box for the detail to sort first. Check Reverse for a descending sort.
- Check the Then by box for the detail to sort second. Check Reverse for a descending sort.
- Check the second Then by box for the detail to sort third. Check Reverse for a descending sort.
| Button | Action |
|---|---|
| Move Up | Move the selected detail up one row. |
| Move Down | Move the selected detail down one row. |
| Select All | Select all details. |
| Reset | Reset to default details. |
| OK | Return to previous page with new details selected. |
| Cancel | Return to previous page with no changes. |
Select the limits for the display
| Data Label | Description |
|---|---|
| Point | Limit display to alarm groups assigned to the point(s). Click Point: button to change Point Pick Details and order. Reset pick list to single select. Decrease pick list length. Increase pick list length. Expand pick list to multiple select. Collapse pick list to single select. |
| Alarm Trigger | Limit display to alarm groups assigned to the alarm trigger(s). Click Alarm Trigger: button to change Alarm Trigger Pick Details and order. |
| Alarm States | Limit display to alarms with selected alarm state. |
| User Group | Limit display to alarm groups assigned to the user group(s). Click User Group: button to change User Group Pick Details and order. |
Alarm Group Add/Copy
The Alarm Group Add page and the Alarm Group Copy page allow users to create new alarm groups. They function in the same way. The Alarm Group Copy page is most convenient when the new alarm group will share points and triggers from the template alarm group. To access the Alarm Group Copy page, click on the Edit button in the template alarm group's row in the Alarm Group List table. The Alarm Group Edit page will be displayed. Click on the Copy button to reach the Alarm Group Copy page.
The Alarm Group Add/Copy page(s) prompt to enter the new alarm group name that is unique to the NovaStar5 system. The Alarm Group Edit page provides the same input fields as the Alarm Group Add and the Alarm Group Copy pages, and these are described in the Alarm Group Edit section.
Alarm Group Edit
Clicking on the Edit button associated with any alarm group defined in the Alarm Group List, or clicking Apply from the Alarm Group Add or Alarm Group Copy pages to create a new alarm group displays the Alarm Group Edit page. The alarm group parameters that are edited or input using the Alarm Group Edit page are grouped under Identification, Point List, and Alarm trigger list headings.

Alarm Group Edit (see also the full-size image)
Identification
| Data Label | Description |
|---|---|
| Table index | Field cannot be modified; it is assigned automatically when a record is added. |
| Name | Alarm group name. Max: 100 characters. |
| Description | Enter additional information describing alarm group. Max: 1000 characters. |
User groups
The User groups table shows the user groups currently assigned to the alarm group.
-
Clicking on any of the column heading buttons will reorder the user groups in the User groups List, numerically or alphabetically, by that detail.
-
Click Details: button to change the User Group List details and display order, see the User Group List Details section.
-
Click Assign/Remove groups button to open User Group Assignment window, see the User Group Assignment section. Changes made to user group assignments will update this page when the assignment window is closed.
-
Click the List button to show all user groups, see the User Group List section.
-
Click Add button to add a user group, see the User Group Add section.
-
Click Edit button to edit the user group, see User Group Edit section.
Point list
The Point list table shows all the points currently associated with the alarm group and can show details about each point.
-
Clicking on any of the column heading buttons will reorder the points in the Point list, numerically or alphabetically, by that detail.
-
Click the Details: button to change the Alarm Group Point List details and display order, see the Point List Details section.
-
Click Assign/Remove points button to open Alarm Group Point Assignment window, see the Alarm Group Point Assignment section. Changes made to point assignments will update this page when the assignment window is closed.
-
Click the List button to show all points, see the Point List section. Click on the Edit button on any alarm trigger's row in the Point list table to view or edit the defining attributes of that point on its Point Edit page. See the Point Edit section.
Trigger List
The Trigger list shows all the alarm triggers currently associated with the alarm group and can show details about each alarm.
-
Clicking on any of the column heading buttons will reorder the alarm triggers in the Trigger list, numerically or alphabetically, by that detail.
-
Click the Details: button to change the Alarm Group Trigger List details and display order, see the Alarm Trigger List section.
-
Click the Assign/Remove triggers button to open Alarm Group Trigger Assignment window, see the Alarm Group Trigger Assignment section. Changes made to trigger assignments will update this page when the assignment window is closed.
-
Click the List button to show all alarm triggers, see the Alarm Trigger List Details section.
-
Click the Add button at the right side of the Trigger list table to access the Alarm Trigger Add page. See the Alarm Trigger Add/Copy section. The Alarm Trigger Add page can be used to create an alarm trigger, but OK must be clicked to return to the Alarm Group Edit screen to assign the alarm trigger to the alarm group.
-
Click on the Edit button on any alarm trigger's row in the Trigger list table to view or edit the defining attributes of that alarm trigger on its Alarm Trigger Edit page. See the Alarm Trigger Edit section.
Alarm Group Point Assignment
The Alarm Group Point Assignment window is opened when the Assign/Remove points button is clicked.
The window is divided into two lists, the Assigned list and the Pick list.
The points available for assignment are shown in the Pick list.
Click on the arrow buttons to move points from the Pick list to the Assigned list add assignments.
Click on the arrow buttons to move points from the Assigned list to the Pick list remove assignments.
Click the OK button to save the assignment changes and close the window.
Click Cancel to abandon changes and close the window.
Click either the Assigned list or Pick list buttons to change Alarm Group Point Pick Details and order, see the Point Pick Details section.

Alarm Group Point Assignment (see also the full-size image)
| Button | Action |
|---|---|
 |
Move all from pick list to assigned list. |
 |
Move from pick list to assigned list. |
 |
Move from assigned list to pick list. |
 |
Move all from assigned list to pick list. |
|
Decrease pick list length. |
|
Increase pick list length. |
|
Expand pick list to multiple select. |
|
Collapse pick list to single select. |
Alarm Group Trigger Assignment
The Alarm Group Trigger Assignment window is opened when the Assign/Remove triggers button is clicked. The window is divided into two lists, the Assigned list and the Pick list.

Alarm Group Trigger Assignment (see also the full-size image)
| Button | Action |
|---|---|
|
Move all from pick list to assigned list. |
|
Move from pick list to assigned list. |
|
Move from assigned list to pick list. |
|
Move all from assigned list to pick list. |
|
Decrease pick list length. |
|
Increase pick list length. |
|
Expand pick list to multiple select. |
|
Collapse pick list to single select. |
Alarm Group Delete
To delete an alarm group from the Alarm Group List, click Edit on that alarm group's row in the table and then click Delete from the Alarm Group Edit screen to view the Alarm Group Delete page. The Alarm Group Delete page prompts to click the Delete button again to confirm that the alarm group should be deleted.
Alarm Point List
Clicking on the Alarm Point List menu command displays the Alarm Point List page. The alarm point list displays the alarm groups and alarm triggers assigned to points. Click the Add button at the upper right-hand corner of the Alarm Point List table to define an alarm trigger using the Alarm Trigger Add page. See the Alarm Trigger Add/Copy section. A new alarm trigger can also be created based on an existing alarm trigger using the Alarm Trigger Copy page. See the Alarm Trigger Add/Copy section.

Alarm Point List (see also the full-size image)
Clicking on any of the column heading buttons will reorder the alarm triggers in the Alarm Point List page, numerically or alphabetically, by that detail. Click on the Edit button on any alarm trigger's row in the Alarm Point List table to view or edit the defining attributes of that alarm trigger on the Alarm Trigger Edit page.
The appearance of the Alarm Point List can be customized using the Choose details... button to access the Alarm Point List Details page.
Alarm Point List Details
The check boxes on Alarm Point List Details page control the items, organization, sort order, and limit the records displayed on the associated List page.

Alarm Point List Details (see also the full-size image)
Select the details to display
- Check the box to the left of a detail to display. Details are displayed in the order shown.
- Check the Order by box for the detail to sort first. Check Reverse for a descending sort.
- Check the Then by box for the detail to sort second. Check Reverse for a descending sort.
- Check the second Then by box for the detail to sort third. Check Reverse for a descending sort.
| Button | Action |
|---|---|
| Move Up | Move the selected detail up one row. |
| Move Down | Move the selected detail down one row. |
| Select All | Select all details. |
| Reset | Reset to default details. |
| OK | Return to previous page with new details selected. |
| Cancel | Return to previous page with no changes. |
Select the limits for the display
| Data Label | Description |
|---|---|
| Station | Limit display to alarm groups assigned to the station(s). Click Station: button to change Station Pick Details and order. Reset pick list to single select. Decrease pick list length. Increase pick list length. Expand pick list to multiple select. Collapse pick list to single select. |
| Point Type | Limit display to alarm point triggers assigned to the point type(s). Click Point type: button to change Point Type Pick Details and order. |
| Point | Limit display to alarm point triggers assigned to the point(s). Click Point: button to change Point Pick Details and order. |
| Alarm Group | Limit display to point triggers assigned to the alarm group(s). Click Alarm Group: button to change Alarm Group Pick Details and order. |
| Alarm Trigger | Limit display to alarm groups assigned to the alarm trigger(s). Click Alarm Trigger: button to change Alarm Trigger Pick Details and order. |
| User Group | Limit display to alarm groups assigned to the user group(s). Click User Group: button to change User Group Pick Details and order. |
Alarm Trigger List
Alarm triggers are the criteria developed by users to define when NovaStar 5 will activate an alarm and associated alarm actions in response to incoming data. The development of appropriate alarm triggers requires judgment and may be altered in response to experience and to accommodate the requirements of emergency responders. The ideal alarm triggers do not create frequent nuisance alarms when circumstances do not warrant response, but also do not fail to provide notification when appropriate. Due to variations in the relationship between monitored data values and the outcomes of interest, it can be difficult to find the correct balance in alarm trigger criteria. For example, precipitation monitoring that strives to provide early warning of potential flooding relies on data reports of measured rainfall at monitored locations. The relationship between that data and actual flooding can be determined after the fact, but is the result of the combination of rainfall distribution (both in space and over time), antecedent ground conditions, rainfall intensity, and flood routing characteristics of the watershed. Not all of these variables have a simple relationship to the monitored data.
Multiple alarm triggers can be assigned to an alarm group. For example, typically an alarm group of precipitation data points are configured to provide alarm notification in the event of heavy rain, but also when data reports are not being received or polled on the expected schedule, etc.

Alarm Trigger List (see also the full-size image)
Click on the Alarm Trigger List menu command to display the Alarm Trigger List page. For a new NovaStar 5 system, no alarm triggers will appear on the Alarm Trigger List page. Click the Add button at the upper right-hand corner of the Alarm Trigger List table to define an alarm trigger using the Alarm Trigger Add page. See the Alarm Trigger Add/Copy section. A new alarm trigger can be created based on an existing template alarm trigger using the Alarm Trigger Copy page. See the Alarm Trigger Add/Copy section.
The Alarm Trigger List shows all of the alarm triggers currently defined in the NovaStar 5 system and can show details about each alarm. Clicking on any of the column heading buttons will reorder the alarm triggers in the Alarm Trigger List page, numerically or alphabetically, by that detail. Click on the Edit button on any alarm trigger's row in the Alarm Trigger List table to view or edit the defining attributes of that alarm trigger on the Alarm Trigger Edit page.
The appearance of the Alarm Trigger List can be customized using the Choose details... button to access the Alarm Trigger List Details page.
Alarm Trigger List Details
The check boxes on Alarm Trigger List Details page control the items, organization, sort order, and limit the records displayed on the associated List page.

Alarm Trigger List Details (see also the full-size image)
Select the details to display
- Check the box to the left of a detail to display. Details are displayed in the order shown.
- Check the Order by box for the detail to sort first. Check Reverse for a descending sort.
- Check the Then by box for the detail to sort second. Check Reverse for a descending sort.
- Check the second Then by box for the detail to sort third. Check Reverse for a descending sort.
| Button | Action |
|---|---|
| Move Up | Move the selected detail up one row. |
| Move Down | Move the selected detail down one row. |
| Select All | Select all details. |
| Reset | Reset to default details. |
| OK | Return to previous page with new details selected. |
| Cancel | Return to previous page with no changes. |
Select the limits for the display
| Data Label | Description |
|---|---|
| Alarm Action | Limit display to alarm triggers assigned to the alarm action(s). Click Alarm Action: button to change Alarm Action Pick Details and order. Reset pick list to single select. Decrease pick list length. Increase pick list length. Expand pick list to multiple select. Collapse pick list to single select. |
| Trigger Type | Limit display to alarm point triggers assigned to the alarm trigger type(s). Click Trigger type: button to change Alarm Trigger Type Pick Details and order. |
| User Group | Limit display to alarm groups assigned to the user group(s). Click User Group: button to change User Group Pick Details and order. |
Alarm Trigger Pick Details
The check boxes on Alarm Trigger Pick Details page control the items, organization, sort order, and limit the records displayed on the pick list.

Alarm Trigger Pick Details (see also the full-size image)
Select the details to display
- Check the box to the left of a detail to display. Details are displayed in the order shown.
- Check the Order by box for the detail to sort first. Check Reverse for a descending sort.
- Check the Then by box for the detail to sort second. Check Reverse for a descending sort.
- Check the second Then by box for the detail to sort third. Check Reverse for a descending sort.
| Button | Action |
|---|---|
| Move Up | Move the selected detail up one row. |
| Move Down | Move the selected detail down one row. |
| Select All | Select all details. |
| Reset | Reset to default details. |
| OK | Return to previous page with new details selected. |
| Cancel | Return to previous page with no changes. |
Select the limits for the display
| Data Label | Description |
|---|---|
| Alarm Action | Limit display to alarm triggers assigned to the alarm action(s). Click Alarm Action: button to change Alarm Action Pick Details and order. Reset pick list to single select. Decrease pick list length. Increase pick list length. Expand pick list to multiple select. Collapse pick list to single select. |
| Trigger Type | Limit display to alarm point triggers assigned to the alarm trigger type(s). Click Trigger type: button to change Alarm Trigger Type Pick Details and order. |
| User Group | Limit display to alarm groups assigned to the user group(s). Click User Group: button to change User Group Pick Details and order. |
Alarm Trigger Add/Copy
The Alarm Trigger Add page and the Alarm Trigger Copy page allow users to create new alarm triggers. They function in the same way. The Alarm Trigger Copy page is most convenient when the new alarm trigger will share several parameters with the template alarm trigger. To access the Alarm Trigger Copy page, click on the Edit button in the template alarm trigger's row in the Alarm Trigger List table. The Alarm Trigger Edit page will be displayed. Click on the Copy button to reach the Alarm Trigger Copy page.
The Alarm Trigger Add /Copy page(s) allows entering the new alarm trigger parameters. The Alarm Trigger Edit page provides the same input fields as the Alarm Trigger Add and the Alarm Trigger Copy pages, and these are described in the Alarm Trigger Edit section.
Alarm Trigger Edit
Clicking on the Edit button associated with any alarm trigger defined in the Alarm Trigger List, or clicking Apply from the Alarm Trigger Add or Alarm Trigger Copy pages to create a new alarm trigger displays the Alarm Trigger Edit page. The alarm trigger parameters that are edited or input using the Alarm Trigger Edit page are described here.

Alarm Trigger Edit Identification (see also the full-size image)
Identification
| Data Label | Description |
|---|---|
| Table index | Field cannot be modified; it is assigned automatically when a record is added. |
| Name | Alarm trigger name. Max: 100 characters. |
| Description | Enter additional information describing alarm trigger. Max: 1000 characters. |
User groups
The User groups table shows the user groups currently assigned to the alarm trigger.
-
Clicking on any of the column heading buttons will reorder the user groups in the User groups List, numerically or alphabetically, by that detail.
-
Click Details: button to change the User Group List details and display order, see the User Group List Details section.
-
Click Assign/Remove groups button to open User Group Assignment window, see the User Group Assignment section. Changes made to user group assignments will update this page when the assignment window is closed.
-
Click the List button to show all user groups, see the User Group List section.
-
Click Add button to add a user group, see the User Group Add section.
-
Click Edit button to edit the user group, see User Group Edit section.
Limits

Alarm Trigger Edit Limits (see also the full-size image)
| Data Label | Description |
|---|---|
| Type | Select alarm trigger type from pick list. The NovaStar 5 system provides nine alarm trigger types that are described in the Alarm Trigger Type List section. Click button to change the Alarm Trigger Type Pick Details, see the Alarm Trigger Type Pick Details section. View button displays the Alarm Trigger Type Edit. List button displays the Alarm Trigger Type List page, see the Alarm Trigger Type List section. If the selection is changed in the Type drop-down list, the trigger parameter fields displayed will change to match the alarm trigger type. |
| Limit | Numeric value at which an alarm will activate. |
| Interval | For rate- of-change alarm trigger types (rise or fall), the interval must also be entered. The alarm is activated when a new data report stored in the database changes by at least the alarm limit over the specified time period interval. No report (norpt) interval alarm trigger types only show the Interval field. Click the button to alternate between interval selection from a pick list or from time interval fields. |
| Reset | Numeric value at which an alarm will reset. A Reset value is entered to prevent minor fluctuations near the alarm limit from producing nuisance alarms for alarms using upper and lower limit criteria. An alarm remains active until the reset value is crossed by new data stored in the database. If the reset value is blank or equal to the limit, any value below the limit causes a reset. No report (norpt) interval alarm trigger types do not have reset values or intervals. The below image demonstrates the use of reset values.  Alarm Trigger Limit and Alarm Reset Logic (see also the full-size image) |
| Interval | For rate-of-change alarm trigger types (rise or fall), the interval must also be entered. The alarm is reset when a new data report stored in the database changes by at least the reset limit over the specified time period interval. Click the button to alternate between interval selection from a pick list or from time interval fields. |
| Threshold | This value is entered for rate-of-change alarm trigger types (rise or fall). When a threshold is set, the new data value must meet or cross the threshold value before this alarm checking is done.  Alarm Trigger Rate of Change Threshold Logic for No Reset (see also the full-size image)  Alarm Trigger Rate of Change Threshold Logic for Rise Reset Interval |
| When | Direction threshold must be passed. none: no threshold used at or above: value must meet or rise above threshold. above: value must rise above threshold. at or below: value must meet or fall below threshold. below: value must fall below threshold. Rise and fall alarm checking does not compute rate of change from the last report to the new report. It checks the change in value over the time period. Rise and fall alarms must specify the period over which the change is checked. A greater change and longer interval acts as a filter to prevent smaller fluctuations from sounding alarms. The alarm is reset when the data value drops by the reset limit over the reset interval. If the reset is zero (0) or blank, any decrease in the data value will cause a reset. |
Actions

Alarm Trigger Edit Actions (see also the full-size image)
| Data Label | Description |
|---|---|
| Nova Score | Select nova score from pick list to assign to data reports meeting alarm trigger criteria. Click button to change the Nova Score Pick Details, see the Nova Score Pick Details section. View button displays the Nova Score Edit page for the selected nova score, see the Nova Score Edit section. List button displays the Nova Score List page, see the Nova Score List section. A nova score can be assigned to an alarm trigger to help categorize the alarm trigger based upon a judgment about the relative severity of the data report values that trigger the alarm. The nova score value is stored with the data report value and can be used to highlight data values in reports and on maps. The higher the nova score value, the "hotter" the background color. The View button to the left of the drop-down list accesses the Nova Score Edit page, while the List button accesses the Nova Score List, see the Nova Score List section. |
| Hidden | Select true to prevent NovaStar 5 from displaying this alarm and setting the alarm flag in the data report. This is useful when alarm triggers are used to set nova score values, control a map display LED, or export data. Displaying these alarms makes it time consuming to search for significant alarms. Hidden alarms can be displayed in the Historic Alarm List by selecting the hidden alarm state detail. |
| When met | Select true to execute alarm actions when alarm criteria are met. |
| When reset | Select true to execute alarm actions when alarm criteria are reset. |
| Message | A message can be entered that will be included when alarm notifications occur as a result of the associated alarm trigger. Max: 1000 characters. |
Action List
The Action list shows all the alarm actions currently associated with the alarm trigger and can show details about each alarm action.

Alarm Trigger Edit Action List (see also the full-size image)
-
Clicking on any of the column heading buttons will reorder the alarm actions in the Action list, numerically or alphabetically, by that detail.
-
Click the Details: button to change the Alarm Trigger Action List details and display order, see the Alarm Action List Details section.
-
Click Assign/Remove actions button to open Alarm Trigger Action Assignment window, see the Alarm Trigger Action Assignment section. Changes made to action assignments will update this page when the assignment window is closed.
-
Click List button to show all alarm actions, see the Alarm Action List section.
-
Click the Add button at the right side of the Action list table to access the Alarm Action Add page. See the Alarm Action Add/Copy section. The Alarm Action Add page can be used to create an alarm action, but OK must be clicked to return to the Alarm Trigger Edit screen to assign the alarm action to the alarm trigger.
-
Click on the Edit button on any alarm action's row in the Action list table to view or edit the parameters of that alarm action on its Alarm Action Edit page, see the Alarm Action Edit section.
Alarm Trigger Action Assignment
The Alarm Trigger Action Assignment window is opened when the Assign/Remove actions button is clicked. The window is divided into two lists, the Assigned list and the Pick list. The actions available for assignment are shown in the Pick list. Click on the arrow buttons to move actions from the Pick list to the Assigned list add assignments. Click on the arrow buttons to move actions from the Assigned list to the Pick list remove assignments.

Alarm Trigger Action Assignment (see also the full-size image)
Click the OK button to save the assignment changes and close the window. Click Cancel to abandon changes and close the window. Click either the Assigned list or Pick list buttons to change Alarm Trigger Action Pick Details and order, see the Alarm Action Pick Details section.
| Button | Action |
|---|---|
|
Move all from pick list to assigned list. |
|
Move from pick list to assigned list. |
|
Move from assigned list to pick list. |
|
Move all from assigned list to pick list. |
|
Decrease pick list length. |
|
Increase pick list length. |
|
Expand pick list to multiple select. |
|
Collapse pick list to single select. |
Alarm Trigger Test
The alarm trigger can be tested by triggering an alarm for the point selected.

Alarm Trigger Edit Trigger Test (see also the full-size image)
| Data Label | Description |
|---|---|
| Point | Select the point for the alarm trigger test from the pick list. Click button to change the Point Pick Details, see the Point Pick Details section. View button displays the Point Edit page for the selected point, see the Point Edit section. Click the Test button to trigger the test alarm. |
Alarm Trigger Delete
To delete an alarm trigger from the Alarm Trigger List, click Edit on that alarm trigger's row in the table and then click Delete from the Alarm Trigger Edit screen to view the Alarm Trigger Delete page. The Alarm Trigger Delete page prompts to click the Delete button again to confirm that the alarm trigger should be deleted.
Alarm Trigger Type List
An alarm trigger type specifies the type of criteria that will be used to evaluate data for an alarm condition. Alarm trigger types prepare NovaStar 5 to evaluate data for the kinds of changes that would indicate a need to activate an alarm. For most users, the alarm trigger types preloaded into NovaStar 5 will be sufficient to include all of the possibilities associated with checking incoming data streams for alarm conditions. Although the creation of additional alarm trigger types is unnecessary, NovaStar 5 allows users to rename the alarm trigger types to either reflect the use of a different language or so that the alarm trigger type names are easy to remember. The available alarm trigger types are described in the Alarm Trigger Type Descriptions Table below.
Alarm Trigger Type Descriptions
| Alarm Trigger Type | Description |
|---|---|
| Upper | Limit alarm activates when data meets or exceeds the upper limit value |
| Lower | Limit alarm activates when data meets or falls below the lower limit value |
| Rise | Alarm activates when data value rises by limit over period |
| Fall | Alarm activates when data value falls by limit over period |
| Norpt | Alarm activates when data does not report within period |
| At | Alarm activates when a data value matches the value |
| System | Alarm activates when NovaStar 5 detects a system failure. System alarms are not related to point report values. They are used by the NovaStar 5 system to alert when a data collection port or backup computer system problem is encountered. |
| Rptcnt | Alarm activates when report count over period is met |
Trigger Type List display button is found on the Alarm Trigger Edit page under the Alarms heading in the command menu of the Registered user Home page. Click on the Trigger Type List to display the Alarm Trigger Type List page. The Edit button at the right side of each alarm trigger type in the Alarm Trigger Type List can be used to access the Alarm Trigger Type Edit page to alter the nomenclature associated with the alarm trigger type numbers that are used by the NovaStar 5 system.

Alarm Trigger Type List (see also the full-size image)
The Alarm Trigger Type List shows all of the alarm trigger types that are predefined for the system. Clicking on any of the column heading buttons will reorder the alarm trigger types in the Alarm Trigger Type List, numerically or alphabetically, by that detail. The appearance of the Alarm Trigger list can be customized using the Choose Details... button to access the Alarm Trigger List Details page, see the Alarm Trigger Type List Details section.
Although the Add button at the upper right-hand corner of the Alarm Trigger Type List page can be used to access the Alarm Trigger Type Add page and create new alarm trigger types, the NovaStar 5 system is not configured to utilize alarm trigger types beyond those that have been predefined.
To delete an alarm trigger type from the Alarm Trigger Type List, click the Edit button on that alarm trigger type's row in the table to access the Alarm Trigger Type Edit page. Click on the Delete button to view the Alarm Trigger Type Delete page. A prompt will be shown to confirm whether to delete the alarm trigger type. To do so click on the Delete button again. Deleting predefined alarm trigger types is not recommended. An alarm trigger type that is assigned to an alarm trigger cannot be deleted.
Alarm Trigger Type List Details
The check boxes on Alarm Trigger Type List Details page control the items, organization, sort order, and limit the records displayed on the associated List page.

Alarm Trigger Type List Details (see also the full-size image)
Select the details to display
- Check the box to the left of a detail to display. Details are displayed in the order shown.
- Check the Order by box for the detail to sort first. Check Reverse for a descending sort.
- Check the Then by box for the detail to sort second. Check Reverse for a descending sort.
- Check the second Then by box for the detail to sort third. Check Reverse for a descending sort.
| Button | Action |
|---|---|
| Move Up | Move the selected detail up one row. |
| Move Down | Move the selected detail down one row. |
| Select All | Select all details. |
| Reset | Reset to default details. |
| OK | Return to previous page with new details selected. |
| Cancel | Return to previous page with no changes. |
Alarm Trigger Type Pick Details
The check boxes on Alarm Trigger Type Pick Details page control the items, organization, sort order, and limit the records displayed on the pick list

Alarm Trigger Type Pick Details (see also the full-size image)
Select the details to display
- Check the box to the left of a detail to display. Details are displayed in the order shown.
- Check the Order by box for the detail to sort first. Check Reverse for a descending sort.
- Check the Then by box for the detail to sort second. Check Reverse for a descending sort.
- Check the second Then by box for the detail to sort third. Check Reverse for a descending sort.
| Button | Action |
|---|---|
| Move Up | Move the selected detail up one row. |
| Move Down | Move the selected detail down one row. |
| Select All | Select all details. |
| Reset | Reset to default details. |
| OK | Return to previous page with new details selected. |
| Cancel | Return to previous page with no changes. |
Alarm Action List
An alarm action describes a response that the NovaStar 5 system can execute in association with an active alarm. Each alarm action is assigned a number that is used internally by the NovaStar 5 system to implement specific processes assigned to specific trigger types. Click on the Alarm Action List menu to display the Alarm Action List page. The Alarm Action List shows all of the alarm actions that are predefined for the system. Clicking on any of the column heading buttons will reorder the alarm action types in the Alarm Action List, numerically or alphabetically, by that detail. The Choose details... button allows specifying what information is displayed by the Alarm Action List page using the Alarm Action List Details page, see the Alarm Action List Details section.

Alarm Action List (see also the full-size image)
Alarm Action List Details
The check boxes on Alarm Action List Details page control the items, organization, sort order, and limit the records displayed on the associated List page.

Alarm Action List Details (see also the full-size image)
Select the details to display
- Check the box to the left of a detail to display. Details are displayed in the order shown.
- Check the Order by box for the detail to sort first. Check Reverse for a descending sort.
- Check the Then by box for the detail to sort second. Check Reverse for a descending sort.
- Check the second Then by box for the detail to sort third. Check Reverse for a descending sort.
| Button | Action |
|---|---|
| Move Up | Move the selected detail up one row. |
| Move Down | Move the selected detail down one row. |
| Select All | Select all details. |
| Reset | Reset to default details. |
| OK | Return to previous page with new details selected. |
| Cancel | Return to previous page with no changes. |
Select the limits for the display
| Data Label | Description |
|---|---|
| Alarm Contact | Limit display to alarm triggers assigned to the alarm action(s). Click Alarm Contact: button to change Alarm Contact Pick Details and order. Reset pick list to single select. Decrease pick list length. Increase pick list length. Expand pick list to multiple select. Collapse pick list to single select. |
| User Group | Limit display to alarm actions assigned to the user group(s). Click User Group: button to change User Group Pick Details and order. |
Alarm Action Pick Details
The check boxes on Alarm Action Pick Details page control the items, organization, sort order, and limit the records displayed on the pick list.

Alarm Action Pick Details (see also the full-size image)
Select the details to display
- Check the box to the left of a detail to display. Details are displayed in the order shown.
- Check the Order by box for the detail to sort first. Check Reverse for a descending sort.
- Check the Then by box for the detail to sort second. Check Reverse for a descending sort.
- Check the second Then by box for the detail to sort third. Check Reverse for a descending sort.
| Button | Action |
|---|---|
| Move Up | Move the selected detail up one row. |
| Move Down | Move the selected detail down one row. |
| Select All | Select all details. |
| Reset | Reset to default details. |
| OK | Return to previous page with new details selected. |
| Cancel | Return to previous page with no changes. |
Select the limits for the display
| Data Label | Description |
|---|---|
| Alarm Contact | Limit display to alarm triggers assigned to the alarm action(s). Click Alarm Contact: button to change Alarm Contact Pick Details and order. Reset pick list to single select. Decrease pick list length. Increase pick list length. Expand pick list to multiple select. Collapse pick list to single select. |
| User Group | Limit display to alarm actions assigned to the user group(s). Click User Group: button to change User Group Pick Details and order. |
Alarm Action Add/Copy
The Alarm Action Add page and the Alarm Action Copy page allow users to create new alarm actions. They function in the same way. The Alarm Action Copy page is most convenient when the new alarm action will share several parameters with the template alarm action. To access the Alarm Action Copy page, click on the Edit button in the template alarm action's row in the Alarm Action List table. The Alarm Action Edit page will be displayed. Click on the Copy button to reach the Alarm Action Copy page.
The Alarm Action Add /Copy page(s) allows entering the new alarm action parameters. The Alarm Action Edit page provides the same input fields as the Alarm Action Add and the Alarm Action Copy pages, and these are described in the Alarm Action Edit section.
Alarm Action Edit
Clicking on the Edit button associated with any alarm action defined in the Alarm Action List, or clicking Apply from the Alarm Action Add or Alarm Action Copy pages to create a new alarm action displays the Alarm Action Edit page. The alarm action parameters that are edited or input using the Alarm Action Edit page are described here.

Alarm Action Edit Identification (see also the full-size image)
Identification
| Data Label | Description |
|---|---|
| Table index | Field cannot be modified; it is assigned automatically when a record is added. |
| Name | Alarm action name. Max: 100 characters. |
| Description | Enter additional information describing alarm action. Max: 1000 characters. |
User groups
The User groups table shows the user groups currently assigned to the alarm action.
-
Clicking on any of the column heading buttons will reorder the user groups in the User groups List, numerically or alphabetically, by that detail.
-
Click Details: button to change the User Group List details and display order, see the User Group List Details section.
-
Click Assign/Remove groups button to open User Group Assignment window, see the User Group Assignment section. Changes made to user group assignments will update this page when the assignment window is closed.
-
Click the List button to show all user groups, see the User Group List section.
-
Click Add button to add a user group, see the User Group Add section.
-
Click Edit button to edit the user group, see User Group Edit section.
Action

Alarm Action Edit Type (see also the full-size image)
| Data Label | Description |
|---|---|
| Type | Select the alarm action type from the pick list. Click Reset button to set default alarm action parameters. |
Alarm Action Custom
User defined alarm action. Alarm action is executed when an alarm is triggered or reset.

Alarm Action Custom (see also the full-size image)
| Data Label | Description |
|---|---|
| Command | Custom alarm command name. Command scripts must be stored in /usr/ns/cus. |
| Options | Command arguments passed to command. |
Alarm Action AlertTalk1
Alert talk 1 alarm action. Alert talk 1 is an alarm dialer that is triggered by a control signal on a serial port. The alarm dialer has up to 4 programmable alarm messages and dialing lists.

Alarm Action AlertTalk1 (see also the full-size image)
| Data Label | Description |
|---|---|
| Command | nsadas1 |
| Modem name | Enter serial port name connected to the Alert talk 1 alarm dialer (e.g. /dev/adas1) or select from pick list. Click button to change the Serial Port Pick Details, see the Serial Port Pick Details. View button displays the Serial Port Edit page for the selected serial port, see the Serial Port Edit. Reset button resets communication parameters to serial port table parameters. |
Alarm Action Alert talk 3 Alarm
Alert talk 3 alarm action. Alert talk 3 is an alarm dialer with pre-recorded messages. It is controlled by the NovaStar 5 AlertTalk3 driver. Alarm messages are encoded and sent to the dialer for speaking by this alarm trigger.

Alarm Action AlertTalk3 Alarm (see also the full-size image)
| Data Label | Description |
|---|---|
| Command | nsadasalarm |
| On acknowledge | Select true to update the alert talk 3 alarm dialert alarm messages when an alarm is acknowledged. |
Alarm Action Alert talk 3 Update
Alert talk 3 point update action. Alert talk 3 is an alarm dialer with pre-recorded messages. It is controlled by the NovaStar 5 AlertTalk3 driver. Point data values are encoded and sent to the dialer for speaking by this alarm trigger.

Alarm Action AlertTalk3 Update (see also the full-size image)
| Data Label | Description |
|---|---|
| Command | nsadasupdate |
Alarm Action Console Alarm
Audible alarm on console computer. Acknowledging the alarm or disabling alarms for system will stop the audible sound.

Alarm Action Console Beep Alarm (see also the full-size image)

Alarm Action Console Wave File Alarm (see also the full-size image)
| Data Label | Description |
|---|---|
| Sound type | Beep uses console buzzer. Wave file sends the select wave file to the sound card. |
| Sound file | Select the alarm sound from the pick list. Click Play to hear the sound file. |
| Command | nsconsolebeep |
| Beep interval | Number seconds to beep, default 2 seconds. |
| Frequency | Beep frequency, default 100 Hz. |
| Hz Length | Beep length in milliseconds, default 200 milliseconds. |
| On acknowledge | Select true to cancel console alarm sound when acknowledged. |
Alarm Action Map Display Lamp Flash
Map display command to flash lamp when alarm criteria met.

Alarm Action Map Display Lamp Flash (see also the full-size image)
| Data Label | Description |
|---|---|
| Command | nslampflash |
Alarm Action Map Display Lamp On
Map display command to turn on lamp when alarm criteria met.

Alarm Action Map Display Lamp On (see also the full-size image)
| Data Label | Description |
|---|---|
| Command | nslampon |
Alarm Action Pager Analog
Analog pager alarm action. Alarm pager telephone number dialed and is followed by the point ID that triggered the alarm. System alarms send digits in message field. Pages are sent for each telephone number in the pager list.
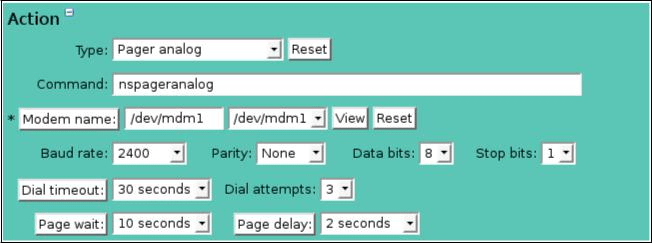
Alarm Action Pager Analog (see also the full-size image)
| Data Label | Description |
|---|---|
| Command | nspageranalog |
| Modem name | Enter telephone modem name (e.g. /dev/mdm1) or select from pick list. Click button to change the Serial Port Pick Details, see the Serial Port Pick Details. View button displays the Serial Port Edit page for the selected serial port, see the Serial Port Edit. Reset button resets communication parameters to serial port table parameters. |
| Baud Rate | 300, 1200, 2400, 4800, 9600, 19200, 38400. |
| Parity | None, Odd, Even, Mark or Space. |
| Data bits | 5, 6, 7 or 8. |
| Stop bits | 1 or 2. |
| Dial timeout | Modem dial connect timeout. Click the button to alternate between interval selection from a pick list or from time interval fields. |
| Dial attempts | Maximum number of dial attempts before the effort is discontinued. |
| Page wait | Delay after dialing the pager service before keying the message. Click the button to alternate between interval selection from a pick list or from time interval fields. |
| Page delay | Delay before dialing the next pager. Click the button to alternate between interval selection from a pick list or from time interval fields |
Alarm Action Pager Digital
Digital pager alarm action. Pager service is dialed, login name sent, then pager telephone numbers sent with alarm message. Pages are sent for each telephone number in the pager list. For point alarms, the point ID, name, alarm value and interval are encoded in email message followed by the alarm trigger message. For system alarms only the alarm message is sent.

Alarm Action Pager Digital (see also the full-size image)
| Data Label | Description |
|---|---|
| Command | nspagerdigital |
| Modem name | Enter telephone modem name (e.g. /dev/mdm1) or select from pick list. Click button to change the Serial Port Pick Details, see the Serial Port Pick Details. View button displays the Serial Port Edit page for the selected serial port, see the Serial Port Edit. Reset button resets communication parameters to serial port table parameters. |
| Service | Telephone number dialed to connect to pager service. |
| Baud Rate | 300, 1200, 2400, 4800, 9600, 19200, 38400. |
| Parity | None, Odd, Even, Mark or Space. |
| Data bits | 5, 6, 7 or 8. |
| Stop bits | 1 or 2. |
| Dial timeout | Modem dial connect timeout. Click the button to alternate between interval selection from a pick list or from time interval fields. |
| Dial attempts | Maximum number of dial attempts before the effort is discontinued. |
| Login attempts | Maximum number of login attempts before the effort is discontinued. |
| Login prompt | Login prompt characters sent by pager service. Respond with login name. |
| Login name | Login name sent to pager service after receiving login prompt. |
| Page attempts | Maximum number of page attempts before the effort is discontinued. |
| Pager prompt | Pager prompt sent by pager service. Respond with pager number. |
| Message prompt | Message prompt sent by pager service. Respond with pager message. |
| Message received | Message received sent by pager service. Page is successful after receiving this string. |
Alarm Action Pager Taps
TAPS pager alarm action. Pager service is dialed, TAPS login name sent, then pager telephone numbers sent with alarm message. Pages are sent for each telephone number in the pager list. For point alarms, the point ID, name, alarm value and interval are encoded in email message followed by the alarm trigger message. For system alarms only the alarm message is sent.

Alarm Action Pager Taps (see also the full-size image)
| Data Label | Description |
|---|---|
| Command | nspagertaps |
| Modem name | Enter telephone modem name (e.g. /dev/mdm1) or select from pick list. Click button to change the Serial Port Pick Details, see the Serial Port Pick Details. View button displays the Serial Port Edit page for the selected serial port, see the Serial Port Edit. Reset button resets communication parameters to serial port table parameters. |
| Service | Telephone number dialed to connect to pager service. |
| Baud Rate | 300, 1200, 2400, 4800, 9600, 19200, 38400. |
| Parity | None, Odd, Even, Mark or Space. |
| Data bits | 5, 6, 7 or 8. |
| Stop bits | 1 or 2. |
| Dial timeout | Modem dial connect timeout. Click the button to alternate between interval selection from a pick list or from time interval fields. |
| Dial attempts | Maximum number of dial attempts before the effort is discontinued. |
| Login attempts | Maximum number of login attempts before the effort is discontinued. |
| Page attempts | Maximum number of page attempts before the effort is discontinued. |
Alarm Action Send Email
Email alarm action. Emails are sent to the email addresses in the contact list. The emails will be from the address and with the email subject defined for this alarm action. For point alarms, the point ID, name, alarm value and interval are encoded in email message followed by the alarm trigger message. For system alarms only the alarm message is sent.
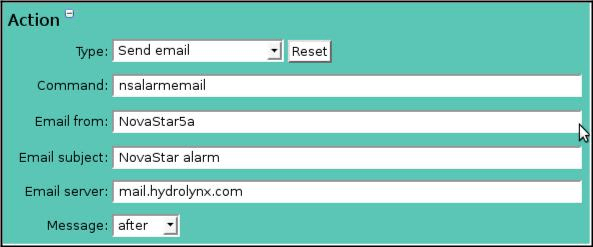
Alarm Action Send Email (see also the full-size image)
| Data Label | Description |
|---|---|
| Command | nspageremail |
| Email from | Email from address. |
| Email subject | Email subject. |
| Email server | Local ntwork SMTP email server name. |
| Message | Position of alarm trigger message with alarm details. after puts alarm trigger message after alarm details. before puts alarm trigger message before alarm details. none does not print the alarm trigger message. only prints alarm trigger message, does not print alarm details. |
Alarm Action Silent Alarm
Visual alarm action, no sound. Active alarm bar will be shown at top of menu bar on all NovaStar5 pages. Disabling alarms privately will prevent the display of the active alarm bar.

Alarm Action Silent Alarm (see also the full-size image)
| Data Label | Description |
|---|---|
| Command | warning |
| Sound file | The alarm sound file will be silent. Choosing any other sound file will change the alarm action to sound alarm. Click Play to hear the sound file. |
Alarm Action Sound Alarm
Visual and audible alarm action. Active alarm bar will be shown at top of menu bar and sound file will play for all NovaStar5 pages. Acknowledging the alarm or disabling alarms privately will stop the display of the active alarm bar and the audible sound. Clicking Mute on the Active Alarm List page, see the Active Alarm List section, will stop the alarm sound but leave on the alarm bar display.|

Alarm Action Sound Alarm (see also the full-size image)
| Data Label | Description |
|---|---|
| Command | warning |
| Sound file | Select the alarm sound file. Choosing the silent sound file will change the alarm action to silent alarm. Click Play to hear the sound file. |
Alarm Action Contact List
The Contact list shows all the alarm contacts currently assigned to the alarm action and can show details about each alarm contact.
-
Clicking on any of the column heading buttons will reorder the alarm contacts in the contact list, numerically or alphabetically, by that detail. Click the Details: button to change the Alarm Action Contact List details and display order, see the Alarm Contact List Details section.
-
Click Assign/Remove contacts button to open Alarm Action Contact Assignment window, see the Alarm Action Contact Assignment section. Changes made to contact assignments will update this page when the assignment window is closed.
-
Click List button to show all alarm contacts, see the Alarm Contact List section.
-
Click the Add button at the right side of the Contact list table to access the Alarm Contact Add page. See the Alarm Contact Add/Copy section. The Alarm Contact Add page can be used to create an alarm contact, but OK must be clicked to return to the Alarm Action Edit screen to assign the alarm contact to the alarm action.
-
Click on the Edit button on any alarm contact's row in the contact list table to view or edit the parameters of that alarm contact on its Alarm Contact Edit page, see the Alarm Contact Edit section.

Alarm Action Edit Contact List (see also the full-size image)
Alarm Action Contact Assignment
The Alarm Action Contact Assignment window is opened when the Assign/Remove contacts button is clicked. The window is divided into two lists, the Assigned list and the Pick list. The contacts available for assignment are shown in the Pick list. Click on the arrow buttons to move contacts from the Pick list to the Assigned list add assignments. Click on the arrow buttons to move contacts from the Assigned list to the Pick list remove assignments. Click the OK button to save the assignment changes and close the window. Click Cancel to abandon changes and close the window. Click either the Assigned list or Pick list buttons to change Alarm Action Contact Pick Details and order, see the Alarm Contact Pick Details section.
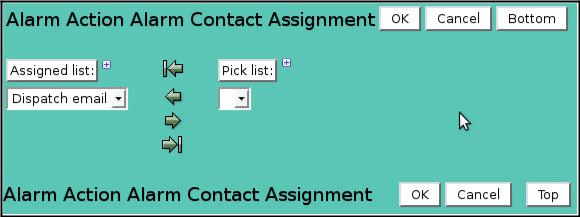
Alarm Action Contact Assignment (see also the full-size image)
| Button | Action |
|---|---|
|
Move all from pick list to assigned list. |
|
Move from pick list to assigned list. |
|
Move from assigned list to pick list. |
|
Move all from assigned list to pick list. |
|
Decrease pick list length. |
|
Increase pick list length. |
|
Expand pick list to multiple select. |
|
Collapse pick list to single select. |
Alarm Action Log
Click the View log file button to display the log file for this alarm action. The log file will show the time stamped activity logged by this alarm action. It can be used to verify the alarm action is working properly. TheLog File Display page is displayed, see the [../system/system.md#log-file-display-alert-receive-data) section.

Alarm Action View Log File (see also the full-size image)
Alarm Action Delete
To delete an alarm action from the Alarm Action List, click the Edit button on that alarm action's row in the table to access the Alarm Action Edit page. Click on the Delete button to view the Alarm Action Delete page. A prompt will be shown to confirm that the alarm action should be removed. Confirm by clicking on the Delete button again.
Alarm Contact List
An alarm contact entry specifies the contact information that will be used to notify a user of an alarm condition. Click on the Alarm Contact List option to display the Alarm Contact List page.

Alarm Contact List (see also the full-size image)
The Alarm Contact List shows all of the alarm contact entries that are predefined for the system. Clicking on any of the column heading buttons will reorder the alarm contact entries in the Alarm Contact List, numerically or alphabetically, by that detail. The Choose details... button allows specifying what information is displayed by the Alarm Contact List page using the Alarm Contact List Details page, see the Alarm Contact List Details section.
Alarm Contact List Details
The check boxes on Alarm Contact List Details page control the items, organization, sort order, and limit the records displayed on the associated List page.

Alarm Contact List Details (see also the full-size image)
Select the details to display
- Check the box to the left of a detail to display. Details are displayed in the order shown.
- Check the Order by box for the detail to sort first. Check Reverse for a descending sort.
- Check the Then by box for the detail to sort second. Check Reverse for a descending sort.
-
Check the second Then by box for the detail to sort third. Check Reverse for a descending sort.
Button Action Move Up Move the selected detail up one row. Move Down Move the selected detail down one row. Select All Select all details. Reset Reset to default details. OK Return to previous page with new details selected. Cancel Return to previous page with no changes.
Select the limits for the display
| Data Label | Description |
|---|---|
| User Group | Limit display to alarm contacts assigned to the user group(s). Click User Group: button to change User Group Pick Details and order. Reset pick list to single select. Decrease pick list length. Increase pick list length. Expand pick list to multiple select. Collapse pick list to single select. |
Alarm Contact Pick Details
The check boxes on Alarm Contact Pick Details page control the items, organization, sort order, and limit the records displayed on the pick list.

Alarm Contact Pick Details (see also the full-size image)
Select the details to display
- Check the box to the left of a detail to display. Details are displayed in the order shown.
- Check the Order by box for the detail to sort first. Check Reverse for a descending sort.
- Check the Then by box for the detail to sort second. Check Reverse for a descending sort.
-
Check the second Then by box for the detail to sort third. Check Reverse for a descending sort.
Button Action Move Up Move the selected detail up one row. Move Down Move the selected detail down one row. Select All Select all details. Reset Reset to default details. OK Return to previous page with new details selected. Cancel Return to previous page with no changes.
Select the limits for the display
| Data Label | Description |
|---|---|
| User Group | Limit display to alarm contacts assigned to the user group(s). Click User Group: button to change User Group Pick Details and order. Reset pick list to single select. Decrease pick list length. Increase pick list length. Expand pick list to multiple select. Collapse pick list to single select. |
Alarm Contact Add/Copy
The Alarm Contact Add page and the Alarm Contact Copy page allow users to create new alarm contacts. They function in the same way. The Alarm Contact Copy page is most convenient when the new alarm contact will share several parameters with the template alarm contact. To access the Alarm Contact Copy page, click on the Edit button in the template alarm contact's row in the Alarm Contact List table. The Alarm Contact Edit page will be displayed. Click on the Copy button to reach the Alarm Contact Copy page.
The Alarm Contact Add /Copy page(s) allows entering the new alarm contact parameters. The Alarm Contact Edit page provides the same input fields as the Alarm Contact Add and the Alarm Contact Copy pages, and these are described in the Alarm Contact Edit section.
Alarm Contact Edit
Clicking on the Edit button associated with any alarm contact defined in the Alarm Contact List, or clicking Apply from the Alarm Contact Add or Alarm Contact Copy pages to create a new alarm contact displays the Alarm Contact Edit page. The alarm contact parameters that are edited or input using the Alarm Contact Edit page are described here.

Alarm Contact Edit (see also the full-size image)
Identification
| Data Label | Description |
|---|---|
| Table Index | Field cannot be modified; it is assigned automatically when a record is added. |
| Name | Alarm action name. Max: 100 characters. |
| Contact | Contact telephone number or email address. Max: 100 characters. |
| Description | Enter additional information describing alarm action. Max: 1000 characters. |
User groups
The User groups table shows the user groups currently assigned to the alarm group.
-
Clicking on any of the column heading buttons will reorder the user groups in the User groups List, numerically or alphabetically, by that detail.
-
Click Details: button to change the User Group List details and display order, see the User Group List Details section.
-
Click Assign/Remove groups button to open User Group Assignment window, see the User Group Assignment section. Changes made to user group assignments will update this page when the assignment window is closed.
-
Click the List button to show all user groups, see the User Group List section.
-
Click Add button to add a user group, see the User Group Add section.
-
Click Edit button to edit the user group, see User Group Edit section.
Alarm Contact Delete
To delete an alarm contact from the Alarm Contact List, click the Edit button on that alarm contact's row in the table to access the Alarm Contact Edit page. Click on the Delete button to view the Alarm Contact Delete page. A prompt will be shown to confirm deleting the alarm contact. Confirm by clicking on the Delete button again.
Alarm State List
Each alarm state is assigned a number that is used internally by the NovaStar 5 system to manage the system's alarms. When a point's data report meets an alarm record's criteria, the alarm record is made active. The alarm remains active until it is acknowledged and reset, and then the alarm state reverts to off.

Alarm State List (see also the full-size image)
Alarm State List is the final sub-command option available under the Alarms heading in the command menu of the Registered user Home page. Click on the Alarm State List option to display the Alarm State List page. The Alarm State List shows all of the alarm states that are predefined for the system. Clicking on any of the column heading buttons will reorder the alarm states in the Alarm State List, numerically or alphabetically, by that detail. The Choose details... button allows specifying what information is displayed by the Alarm State List page using the Alarm State List Details page, see the Alarm State List Details section.
Although the Add button at the upper right-hand corner of the Alarm State List page can be used to access the Alarm State Add page and create new alarm states, the present version of the NovaStar 5 system is not configured to utilize alarm states beyond those that have been predefined. Because the numerical assignments preloaded into NovaStar 5 cannot be altered by users, editing the Alarm State List is not recommended, except as desired to rename the alarm states to either reflect the use of a different language or so that the alarm state nomenclature is easy to remember.
The Edit button at the right side of each alarm state in the Alarm State List can be used to access the Alarm State Edit page to alter the nomenclature associated with the alarm state numbers that are used by the NovaStar 5 system.
To delete an alarm state from the Alarm State List, click the Edit button on that alarm state's row in the table to access the Alarm State Edit page. Click on the Delete button to view the Alarm State Delete page. A prompt will be shown to confirm deleting the alarm state. Confirm the deletion by clicking on the Delete button again. Deleting predefined alarm states is not recommended.
Alarm State List Details
The check boxes on Alarm State List Details page control the items, organization, sort order, and limit the records displayed on the associated List page.

Alarm State List Details (see also the full-size image)
Select the details to display
- Check the box to the left of a detail to display. Details are displayed in the order shown.
- Check the Order by box for the detail to sort first. Check Reverse for a descending sort.
- Check the Then by box for the detail to sort second. Check Reverse for a descending sort.
-
Check the second Then by box for the detail to sort third. Check Reverse for a descending sort.
Button Action Move Up Move the selected detail up one row. Move Down Move the selected detail down one row. Select All Select all details. Reset Reset to default details. OK Return to previous page with new details selected. Cancel Return to previous page with no changes.
Alarm State Pick Details
The check boxes on Alarm State Pick Details page control the items, organization, sort order, and limit the records displayed on the pick list.

Alarm State Pick Details (see also the full-size image)
Select the details to display
- Check the box to the left of a detail to display. Details are displayed in the order shown.
- Check the Order by box for the detail to sort first. Check Reverse for a descending sort.
- Check the Then by box for the detail to sort second. Check Reverse for a descending sort.
-
Check the second Then by box for the detail to sort third. Check Reverse for a descending sort.
Button Action Move Up Move the selected detail up one row. Move Down Move the selected detail down one row. Select All Select all details. Reset Reset to default details. OK Return to previous page with new details selected. Cancel Return to previous page with no changes.